I've been working on getting Linux to be fully functional on an AllWinner A13 tablet. If you haven't heard, AllWinner A10 and A13 CPUs are the greatest thing since sliced bread when it comes to working with cheap hardware. A13 tablets go for $39 wholesale in China, and about $65 shipped to your door in the USA.
The open source driver for the A13 camera doesn't seem to work, so I will be trying to find out what the problem is and fix it. The plan is to tap the I2C bus that controls the camera and spy on it with a logic analyzer to see what is going wrong with the driver. This post will just cover figuring out which lines to tap into, and a follow up post will show the actual analysis of the I2C bus. This is a technique I have used successfully to fix the driver for the Goodix GT811 touchscreen.
The camera is that little round cutout at the bottom of the tablet shown above. A closeup of the camera can be seen below.
Amazingly, this camera is held in place by a piece of sticky tape. Yes, sticky tape. Chinese manufacturing at its finest. But it seems to stay in place, so who am I to criticize?
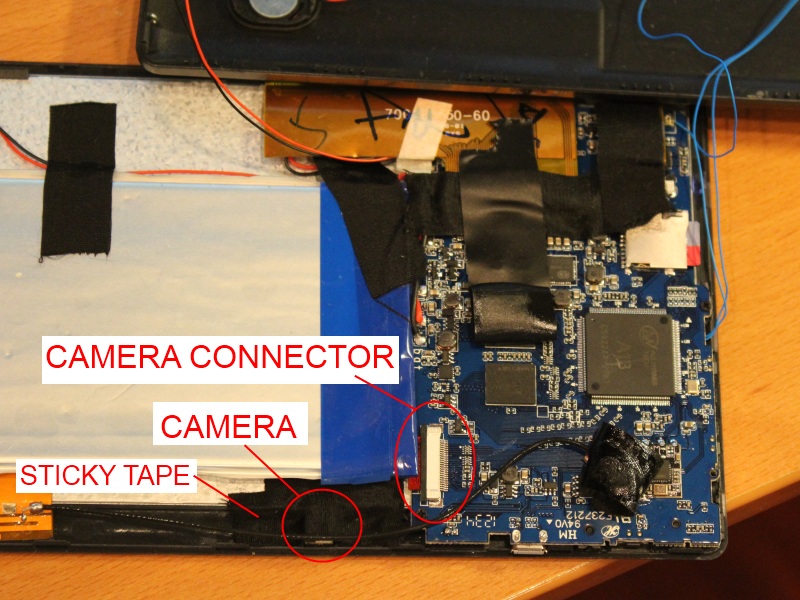
First step is to crack open the tablet. These tablets are snap together, so no screws hold the two halves of the tablet together. Below is a picture of the tablet after it has been opened up. The LCD screen is facing down against the table top, and the PCB and battery are mounted to the back of the LCD. The back of the plastic cover can be seen in the top of the picture. I have a lot of debug wires (the blue wires running everywhere) which are attached to the back plastic cover. Not all the sticky tape is from the factory, some is mine because the factory tape loses its grip after repeated removals.
Unrelated anecdote (your reading my blog so you have to listen to my ramblings too), many years ago when I was shopping for electronics in shadier parts of Hong Kong, every hawker selling questionable electronics would always claim that even though the brand was something that nobody had ever heard of, they all had "Sony guts"
In the picture above, you can see how the camera at the bottom is just held in place with sticky tape. I didn't remove all the tape holding the camera in place because I was worried it would never go back in place again. You can also see the camera connector that I am interested in.
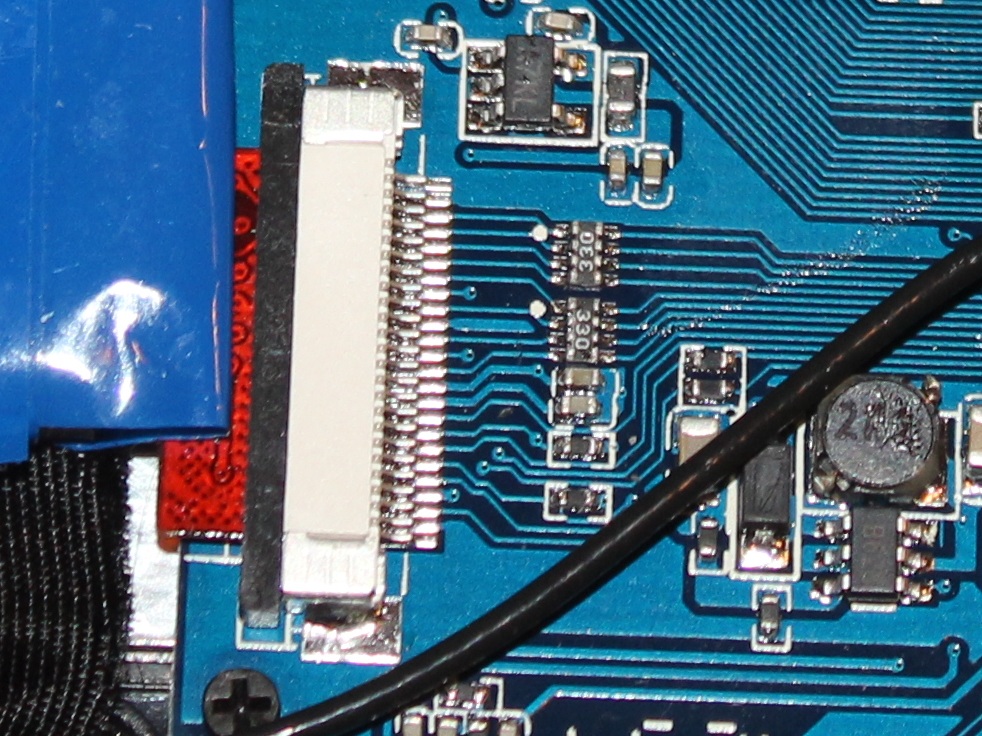
Below is a closeup of the camera connector
So from the A13 datasheet, we know the CSI has the following signal lines:
CSI_PCLK - Pixel Clock
CSI_MCLK - Sensor Clock
CSI_HSYNC - Horizontal Sync
CSI_VSYNC - Vertical Sync
CSI_D7:0 - 8 Data lines
We also know that the tablet uses a GalaxyCore GC0308 Camera. From the GC0308 datasheet we see that it uses the following signal lines
AVDD25 - 0.1uF Filtering cap to ground
VREF - 0.1uF Filtering cap to ground
SBDA - I2C Data Line
SBCL - I2C Clock Line
D7:0 - 8 Data Lines
GND - Ground
PWDN - Powerdown signal (active high)
HSYNC - HSYNC output
VSYNC - VSYNC output
DVDD28 - 2.8V input
RESETB - Reset (active low)
INCLK - Input Clock
The 8 data lines are easy to spot with the 4 element resistor arrays protecting the data bus.
The 2 filtering caps for AVDD25 and VREF are also easy to spot.
That just leaves the 2 mystery resistors. It is easy to tell if they are the pullups required for the I2C bus by checking if the side of the resistor not connected to the flex connector are tied together and tied to 3.3V. Then we know for sure they are the pullups for the I2C data and clock lines and we can tap into the I2C signals by soldering some very fine wires to the side of the resistor that is connected to the flex connector.
After checking the voltage at the two resistors, it is confirmed that they are both at 2.8V which means they are indeed the I2C pullup resistors. (I said 3.3V, close enough)
In Part 2, I will solder fine wires to the resistors and we hook the logic analyzer up! Always fun soldering wires to 0402 resistors (Thats 0.04" x 0.02", or about the width of 2 human hairs side by side)
Thursday, October 25, 2012
Sunday, July 8, 2012
Enabling Composite Video on the Mele A1000 Set Top Box (AllWinner A10)
Just a quick program to enable the composite video interface on the Mele A1000 Set Top Box.
/***
* Small program to enable composite video (NTSC) on Mele A1000
*
* Based on information from
* http://www.cnx-software.com/2012/04/28/how-to-create-your-own-debian-ubuntu-image-for-mele-a1000-allwinner-a10-based-stb/
* which shows how to enable the VGA interface
*
* Copyright (C) 2012 Lawrence Yu
*
* Permission is hereby granted, free of charge, to any person obtaining a copy of this software and associated
* documentation files (the "Software"), to deal in the Software without restriction, including without limitation
* the rights to use, copy, modify, merge, publish, distribute, sublicense, and/or sell copies of the Software,
* and to permit persons to whom the Software is furnished to do so, subject to the following conditions:
*
* The above copyright notice and this permission notice shall be included in all copies or substantial portions of
* the Software.
*
* THE SOFTWARE IS PROVIDED "AS IS", WITHOUT WARRANTY OF ANY KIND, EXPRESS OR IMPLIED, INCLUDING BUT NOT LIMITED TO
* THE WARRANTIES OF MERCHANTABILITY, FITNESS FOR A PARTICULAR PURPOSE AND NONINFRINGEMENT. IN NO EVENT SHALL THE
* AUTHORS OR COPYRIGHT HOLDERS BE LIABLE FOR ANY CLAIM, DAMAGES OR OTHER LIABILITY, WHETHER IN AN ACTION OF CONTRACT,
* TORT OR OTHERWISE, ARISING FROM, OUT OF OR IN CONNECTION WITH THE SOFTWARE OR THE USE OR OTHER DEALINGS IN THE
* SOFTWARE.
***/
// --------------------------------------------------
// Includes
// --------------------------------------------------
#include <stdio.h>
#include <fcntl.h>
// --------------------------------------------------
// Constants
// --------------------------------------------------
#define DISP_CMD_TV_ON 0x180
#define DISP_CMD_TV_OFF 0x181
#define DISP_CMD_TV_SET_MODE 0x182
#define DISP_CMD_HDMI_OFF 0x1c1
#define NOARG 0x00
// --------------------------------------------------
// Global Variables
// --------------------------------------------------
int g_display;
// --------------------------------------------------
// Functions
// --------------------------------------------------
void cmd(unsigned long cmd, unsigned long argval) {
// Variables
unsigned long args[4];
int ret;
// Send the command
args[0] = 0x00;
args[1] = argval;
args[2] = 0x00;
args[3] = 0x00;
ret = ioctl(g_display, cmd, (unsigned long)args);
printf("Sent Command %02X(%02X) = %02X\n", cmd, argval, ret);
}
// --------------------------------------------------
// Main Functions
// --------------------------------------------------
int main(int argc, char const *argv[]) {
// Initialize the display
g_display = open("/dev/disp", O_RDWR, 0);
// Turn off the HDMI
cmd(DISP_CMD_HDMI_OFF, NOARG);
// Turn off the TV
cmd(DISP_CMD_TV_OFF, NOARG);
// Set the TV Mode
cmd(DISP_CMD_TV_SET_MODE, 0x0e);
// Turn on the TV
cmd(DISP_CMD_TV_ON, NOARG);
}
Friday, March 9, 2012
Better Remote Desktop Resolutions on Linux
Did you know you can remote desktop into a linux machine and have the remote desktop resolution be much larger than the physical screen attached to the actual linux machine? I have a linux machine with an old 14" LCD that could only go up to 1024x768. My main development machine has 1600x1200 monitors. I found it was possible to have the remote desktop session be at the full 1600x1200 even though the monitor connected to the linux machine could only go up to 1024x768.
Simply use the following command:
If you primary monitor is not "VGA-0", replace "VGA-0" with your monitor. To find out the names of your monitors, just run xrandr without any parameters
Simply use the following command:
xrandr --output VGA-0 --panning 1600x1200
Now your remote desktop session will be displayed as if it were on a 1600x1200 monitor. Development bliss...
If you primary monitor is not "VGA-0", replace "VGA-0" with your monitor. To find out the names of your monitors, just run xrandr without any parameters
xrandr
Monday, January 2, 2012
Creating a Production Rails 3.1 Server (Ubuntu 10.04 LTS)
The following are instructions on how to create a production Rails 3.1 Server using Ubuntu 10.04 LTS
Download the Ubuntu 10.04.3 LTS 64 bit Server ISO from here and install it. Install the "LAMP Server" and "OpenSSH Server" packages when prompted.
Install prerequisites
sudo apt-get install build-essential libyaml-dev zlib1g-dev libcurl4-openssl-dev libssl-dev libopenssl-ruby apache2-prefork-dev libapr1-dev libaprutil1-dev
Download the Ruby source code and compile it
cd ~
mkdir ruby_src
cd ruby_src
wget http://ftp.ruby-lang.org/pub/ruby/1.9/ruby-1.9.3-p0.tar.gz
tar -zxvf ruby-1.9.3-p0.tar.gz
cd ruby-1.9.3-p0
./configure
make
sudo make install
mkdir ruby_src
cd ruby_src
wget http://ftp.ruby-lang.org/pub/ruby/1.9/ruby-1.9.3-p0.tar.gz
tar -zxvf ruby-1.9.3-p0.tar.gz
cd ruby-1.9.3-p0
./configure
make
sudo make install
Verify Ruby installed correctly
ruby -v
Expected output is "ruby 1.9.3p0 (2011-10-30 revision 33570) [x86_64-linux]"
Download the RubyGems source code and compile it
cd ~
mkdir rubygems_src
cd rubygems_src
wget http://rubyforge.org/frs/download.php/75573/rubygems-1.8.12.tgz
tar -zxvf rubygems-1.8.12.tgz
cd rubygems-1.8.12
sudo ruby setup.rb
mkdir rubygems_src
cd rubygems_src
wget http://rubyforge.org/frs/download.php/75573/rubygems-1.8.12.tgz
tar -zxvf rubygems-1.8.12.tgz
cd rubygems-1.8.12
sudo ruby setup.rb
Verify RubyGems installed correctly
gem -v
Expected output is "1.8.12"
Install Rails
sudo gem install rails
Verify Rails installed correctly
rails -v
Expected output is "Rails 3.1.3"
Install Phusion Passenger
sudo gem install passenger
sudo passenger-install-apache2-module
Configure Apache by adding these lines to /etc/apache2/apache2.conf
LoadModule passenger_module /usr/local/lib/ruby/gems/1.9.1/gems/passenger-3.0.11/ext/apache2/mod_passenger.so
PassengerRoot /usr/local/lib/ruby/gems/1.9.1/gems/passenger-3.0.11
PassengerRuby /usr/local/bin/ruby
PassengerRoot /usr/local/lib/ruby/gems/1.9.1/gems/passenger-3.0.11
PassengerRuby /usr/local/bin/ruby
Configure your rails application by adding these lines to /etc/apache2/apache2.conf, assuming the name of your app is Mytest. Make sure to change the ServerName to the name of the server.
<VirtualHost *:80>
ServerName www.yourhost.com
DocumentRoot /usr/local/mytest/public
<Directory /usr/local/mytest/public>
AllowOverride all
Options -MultiViews
</Directory>
</VirtualHost>
Restart Apache
sudo /etc/init.d/apache2 restart
Modify the Gemfile to include execjs and therubyracer if needed. Then run "sudo bundle install"
Rails application housekeeping
sudo bundle update
RAILS_ENV=production rake db:create db:schema:load
rake assets:precompile
sudo /etc/init.d/apache2 restart
RAILS_ENV=production rake db:create db:schema:load
rake assets:precompile
sudo /etc/init.d/apache2 restart
Sunday, October 16, 2011
Ruby On Rails 3.1 Cheat Sheet
* To create a new application use the rails new command. Replace MyApp with the actual name of your application.
* If running Ruby On Rails 3.1 on Ubuntu, you will encounter an error stating " Could not find a JavaScript runtime". To fix this locate the Gemfile in the root of your application and append the following two lines
then, to update the bundles run the following command
* To run the development webserver for your application use the following command
Then from any web browser, navigate to port 3000 of your Ruby on Rails server. In my case the machine name is testror. Substitute with your server name or ip address.
* To manually work with the sqlite database, use the sqlite3 command followed by the name of the database file
To show a list of tables while inside sqlite use the .tables command
To exit sqlite use the .exit command
* To search for the first record which matches in a database table bound to a model use
* Variable Scoping
rails new MyApp
* If running Ruby On Rails 3.1 on Ubuntu, you will encounter an error stating " Could not find a JavaScript runtime". To fix this locate the Gemfile in the root of your application and append the following two lines
gem 'execjs'
gem 'therubyracer'
gem 'therubyracer'
then, to update the bundles run the following command
bundle install
* To run the development webserver for your application use the following command
rails server
Then from any web browser, navigate to port 3000 of your Ruby on Rails server. In my case the machine name is testror. Substitute with your server name or ip address.
http://testror:3000
* To manually work with the sqlite database, use the sqlite3 command followed by the name of the database file
sqlite3 development.sqlite3
To show a list of tables while inside sqlite use the .tables command
.tables
To exit sqlite use the .exit command
.exit
* To search for the first record which matches in a database table bound to a model use
@info = Info.find(:first, :conditions => [ "name = ?", "a"])
* Variable Scoping
$ - a global variable @ - an instance variable [a-z] - local variable [A-Z] - constant @@ - class static variable
Monday, July 4, 2011
How to shutdown ubuntu server properly
The right way to shutdown an ubuntu server is simply
Notice the -h option. Without that the system doesn't really shutdown and you end up at the Recovery Menu which is really annoying on a headless server.
sudo shutdown -h now
Notice the -h option. Without that the system doesn't really shutdown and you end up at the Recovery Menu which is really annoying on a headless server.
2.3 Drill Format in Eagle
Just a tidbit for anyone else who runs into this problem. To change EAGLE 4.16r2 to use a 2.3 leading zero drill format modify the following sections of the eagle.def file in your installation of eagle. The eagle.def file is located in the bin directory of your eagle installation. Relevant changes are shown highlighted in red.
Just Why does 2.3 leading zero even matter? I'm not sure it really even does anymore. Many years ago when batchpcb and golden phoenix PCB first hit the scene they were pretty stringent on the drill file being a specific format. I think the process of submitting PCBs has advanced far enough now that nobody may even care how screwed up the drill file is, but since I have always had good success sending it in the required 2.3 leading zero format, i figure why change a good thing. I did recently send some boards to SeeedStudio in a quite messed up drill format and they processed it just fine so maybe nobody really does care anymore.
[EXCELLON]
Type = DrillStation
Long = "Excellon drill station"
Init = "%%\nM48\nM72\n"
Reset = "M30\n"
ResX = 1000
ResY = 1000
;Rack = ""
DrillSize = "%sC%0.4f\n" ; (Tool code, tool size)
AutoDrill = "T%02d" ; (Tool number)
FirstDrill = 1
BeginData = "%%\n"
Units = Inch
Select = "%s\n" ; (Drill code)
Drill = "X%05.0fY%05.0f\n" ; (x, y)
Info = "Drill File Info:\n"\
"\n"\
" Data Mode : Absolute\n"\
" Units : 1/1000 Inch\n"\
"\n"
Type = DrillStation
Long = "Excellon drill station"
Init = "%%\nM48\nM72\n"
Reset = "M30\n"
ResX = 1000
ResY = 1000
;Rack = ""
DrillSize = "%sC%0.4f\n" ; (Tool code, tool size)
AutoDrill = "T%02d" ; (Tool number)
FirstDrill = 1
BeginData = "%%\n"
Units = Inch
Select = "%s\n" ; (Drill code)
Drill = "X%05.0fY%05.0f\n" ; (x, y)
Info = "Drill File Info:\n"\
"\n"\
" Data Mode : Absolute\n"\
" Units : 1/1000 Inch\n"\
"\n"
Just Why does 2.3 leading zero even matter? I'm not sure it really even does anymore. Many years ago when batchpcb and golden phoenix PCB first hit the scene they were pretty stringent on the drill file being a specific format. I think the process of submitting PCBs has advanced far enough now that nobody may even care how screwed up the drill file is, but since I have always had good success sending it in the required 2.3 leading zero format, i figure why change a good thing. I did recently send some boards to SeeedStudio in a quite messed up drill format and they processed it just fine so maybe nobody really does care anymore.
Subscribe to:
Posts (Atom)